This rule is very easy to understand and reduces your
calculation. If you practice it enough then it turns to be fatal for your
opponent in even complex king and pawn endings.
Rule: For any passed pawn draw a square as described in the
diagram.
Outcomes:
1. If defender king is inside the square, pawn require its king’s help to promote and win will be decided on whether stronger side king will be able to occupy the one of the key squares or not.
2. If defender king is out side the square, Pawn promotes itself.
Rule is very simple yet requires lots of practice so today I
am giving more examples as compare to others.
Examples
I request you to solve the diagram first then look for the answers.
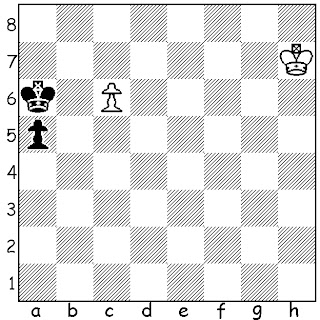
1 # White to move
1.Kc8! Kc6 2.Kb8!! Kb5 3.Kb7 Kxa5 [3...h5?? 4.a6] 4.Kc6 h5 5.Kd5 ½–½
1.Kg6 a4 [1...Kb6 2.Kf5] 2.Kf5 Kb6 [2...a3 3.Ke6] 3.Ke5 a3 [3...Kxc6 4.Kd4] 4.Kd6 a2 5.c7 Kb7 6.Kd7 ½-½
1.Kg4 b5 2.d4 b4 3.d5 Kb5 4.d6 [4.Kf5 b3 5.d6 b2 6.d7 b1Q+] 4...Kc6 5.Kf5 b3 [5...Kxd6 6.Ke4 Kc5 7.Kd3] 6.Ke6 b2 7.d7 ½-½
4 # White to move
1.Kb7 Kc4 2.Kc7 d5 3.Kc6 d4 4.b5 ½-½
5 # White to move
1.Kb3 [1.Ka5 f5 2.b4 f4 3.b5 Kc5 4.b6 Kc6 5.Ka6 f3 6.b7 f2 7.b8Q f1Q+ 8.Ka5 Qa1+ 9.Kb4 Qb1+ 10.Kc4 Qxb8] 1...Kd3 [1...f5 2.Kc2 Ke3 3.b4] 2.Ka2 f5 3.b4 Kc4 4.b5 Kxb5 5.Kb3 ½-½
6 # White to move
1.Kg7 h4 2.Kf6 Kb6 [2...h3 3.Ke6] 3.Ke5 h3 4.Kd6 ½-½
Test Positions
 |
| White to move |
 |
| White to Move |
 |
| Black to Move |
Solutions will be published in next endgame study section.
Solutions for the test positions of Opposition ( Endgame Study 28/02/2013) :
if you would like to retrieve last endgame study puzzles click here.
Position 1
1.Kh4 [1.Kg3 Kg5 Draw] 1...Kg6 2.Kg4 Kf6 3.Kf4 Ke6 4.Ke4 Kd6 5.Kd4 b3 [5...Kc6 6.Kc4 Kb6 7.Kxb4 Kc6 8.Kc4+-] 6.cxb3 Kc6 7.Kc4 Kb6 8.Kb4 Kc6 9.Ka5 1-0
Position 2
1.Kd6 Kf7 2.Kd5 Kf6 the game is as there is no chance for white king to penetrate into black's position despite of having opposition draw
Position 3
1.Kf4 Diagonal Oppostion!! 1...Kh7 2.Kg5 Kh8 3.Kh6 Opposition 3...Kg8 4.Kxg6 1-0


No comments:
Post a Comment